find-your-products-categories-in-amazon
A Step-by-Step Guide to Finding Your Product Category and Listing Items on Amazon

Finding Product Category and Listing Items on Amazon

How to Find Product Category in Amazon? Amazon, the marketplace globally provides an unprecedented opportunity for both individuals and businesses to connect with a vast customer base, across the world. Whether you’re a seller or new to the realm of e commerce it is essential to grasp the process of selecting the right product category and effectively listing your items on Amazon. This comprehensive guide will take you through each step ensuring an understanding.

Step 1; Researching Your Product

Before contemplating listing a product on Amazon it is crucial to conduct research. Here’s how you can approach it;

1.1 Market Research; Utilize Amazons own tools like Amazon Best Sellers to identify products across categories. Additionally consider employing third party resources such as Jungle Scout, Helium 10 or AMZScout for in depth market analysis.

1.2 Competition Analysis; Evaluate competitors within your chosen category. Analyze their pricing strategies, product descriptions and customer reviews to gain insights into practices.

Step 2; Creating an Amazon Seller Account

To list your products on Amazon successfully you’ll need to set up a seller account. Here are the primary types available; How to create amazon seller account

2.1 Individual Seller Account; Ideal, for individuals and small scale sellers.
You are charged a fee, for each item you sell.

2.2. Professional Seller Account; This option is perfect for businesses that intend to sell a number of items. You pay a subscription fee. In return you gain access, to additional tools and features.

Step 3; Choose the Category, for Your Product

3.1. Sign in to Your Seller Account; After setting up your seller account log in to Amazons Seller Central.

3.2. Access ‘Add a Product’; Within Seller Central go to the ‘Inventory’ tab. Click on ‘Add a Product.’

3.3. Find Your Product; Enter a few keywords in the search bar and Amazon will suggest categories for your product. Select the one.

Step 4; Create Your Product Listing

Now that you have chosen your product category it’s time to create a listing for your product by following these steps;

4.1. Provide Product Information; Fill in all details about your product, including its title, brand, manufacturer and product identification (such as UPC, EAN or ISBN).

4.2. Determine Pricing; Set the price for your product considering factors such as costs involved competition analysis and desired profit margin.

4.3. Manage Inventory; Specify the quantity of products, for sale.

4.4. Write an Engaging Product Description; Craft an compelling description that highlights the features and benefits of your product while incorporating high quality images to showcase it effectively.

4.5. Choose the method of fulfillment that suits you best;. Handle shipping yourself (FBM. Fulfilled by Merchant) or opt for Amazons fulfillment centers (FBA. Fulfilled by Amazon).

4.6. Take control of your shipping options by configuring rates and delivery times according to your preferences.

Step 5; Take some time to carefully review and double check

All the information you’ve entered before publishing your product listing. Make sure that your listing follows Amazons policies and guidelines. Once you’re satisfied click the “Publish” button to make your product available, on Amazons marketplace.

Step 6; It’s not enough to list your product on Amazon;

You need to promote it for success. Consider using Amazon Advertising optimizing your product listings for search (Amazon SEO) and encouraging customer reviews to increase visibility and build credibility for your product.

Amazon ATES Training

In conclusion

Listing products on Amazon can be a venture if you do it right. By researching your product selecting the category and creating compelling listings you can improve your chances of success in the competitive e commerce world. Remember that long term success on Amazon goes beyond listing products; providing customer service consistently and continually improving your listings based on customer feedback and market trends are key factors. Best of luck with your journey, as an Amazon seller!

If you are looking for amazon ates online trainingWhat is ATES in Amazon? – ATESpost, then these link sources may help you out. Additional Information, Go through – How to create seller account on Etsy?

threatlocker
Introducing ThreatLocker: The Essence of Zero Trust Endpoint Security

In our interconnected society, where cyberattacks and data breaches are becoming more advanced and widespread it is no longer sufficient to rely on security measures to protect organizations from digital threats. Zero Trust Endpoint Security has emerged as a shift, in cybersecurity and at the forefront of this transformation is ThreatLocker. This innovative solution embodies the fundamental principles of Zero Trust and in this article we will delve into what Zero Trust Endpoint Security entails and how ThreatLocker is leading the charge, in securing organizations in todays era.

For Login – ThreatLocker Login

threatlocker

Understanding the Concept of Zero Trust Endpoint Security

Zero Trust Endpoint Security is a cybersecurity approach that questions the idea of trust within a network. In the organizations used to believe that once a device was granted access, to their network it could be relied upon. However this outdated belief system has shown its weaknesses in terms of susceptibility, to breaches and insider threats. Conversely Zero Trust operates on the principle of “never trust, verify.”

Key Points

One of the principles of Zero Trust Endpoint Security is to prioritize verification of blindly trusting devices connected to a network. This means that continuous authentication and authorization are required for every user, device and application to ensure they meet the security requirements.

Another important principle is implementing privilege access. This involves granting users and devices the level of access required for their specific tasks. By doing it reduces the attack surface and limits the extent of damage in case there is a breach.

Micro segmentation involves dividing networks into zones to hinder cyber attackers from moving laterally. This strategy effectively contains breaches. Prevents their propagation, across the network.

Continuous monitoring of devices and network traffic allows for detection and response to any activity ensuring enhanced security measures.

Data encryption is a practice that involves encoding data both during transmission and while, at rest. By encrypting data even if attackers manage to gain access they will be unable to comprehend the information.

Introducing ThreatLocker

ThreatLocker is a cybersecurity solution that embraces the principles of Zero Trust Endpoint Security. It empowers organizations to establish a security posture by offering the following functionalities;

Application Whitelisting; With ThreatLocker strict control is enforced over which applications can run on endpoints. Trusted and authorized applications are permitted to execute significantly reducing the risk of malware infections and unapproved software installations.

Ringfencing and Micro Segmentation; This platform enables organizations to create policies, for controlling network access. It restricts applications from communicating with endpoints effectively isolating threats.

Zero Trust Policy Enforcement; ThreatLocker ensures authentication and authorization for every device, user and application. It follows the Zero Trust principle of never assuming trust by default.

Behavioral Analysis; The solution utilizes analysis to identify and block activities even if they originate from authorized applications or users.

Data Protection; To safeguard information ThreatLocker incorporates data encryption features that make it inaccessible, to users or cybercriminals.

The utilization of ThreatLocker and the Zero Trust Endpoint Security model offers advantages;

  1. Improved Security; By taking an approach ThreatLocker effectively minimizes the attack surface. Provides strong protection, against various threats like malware, ransomware and others.
  2. Mitigated Risk; With access controls and continuous monitoring the risk of data breaches and insider threats is significantly reduced.
  3. Compliance; Organizations can ensure data security and privacy by achieving and maintaining compliance with industry regulations.
  4. Adaptability; ThreatLockers policies can be customized to meet each organizations needs, accommodating requirements and workflows.
  5. Cost Efficiency; By preventing security incidents and data breaches organizations can avoid consequences associated with cyberattacks.

In conclusion

In todays evolving landscape of cybersecurity threats an adaptable approach, to security is crucial. Zero Trust Endpoint Security, as exemplified by ThreatLocker embodies cybersecurity principles. It advocates for a “never trust, always verify” philosophy that keeps organizations ahead of cyber threats. Implementing ThreatLockers robust security features empowers organizations to strengthen their defenses, safeguard data. Operate in an environment where trust is continuously verified rather than assumed.

If you would like to publish your articles as a guest post, then you can connect with us and share your article with us – Write for Us Guest Post

Disclaimer: This post is highly recommended for information purpose only.

Write for us Guest Post

First of all I would like to say thank you to be here, and welcome you to be part of us for next. We always respect and appreciate your talent and will try to give you our best. We hope that before our team checks your content, you must have checked your content thoroughly.

Our content checker team pays special attention to some things, which you will find below in the form of a list. You check it properly and send your content according to these guidelines.

  1. Your content should be written according to our users (mean while your content should be userfriendlly)
  2. Your content must be grammatically correct.
  3. There should be no spelling mistake in your content.
  4. Your content should be well organized.
  5. Your content should not contain plagiarism (means your content must be plagiarism free)
  6. Your content should be more than 500 words.

Send your content by this email – contactguestposting@gmail.com

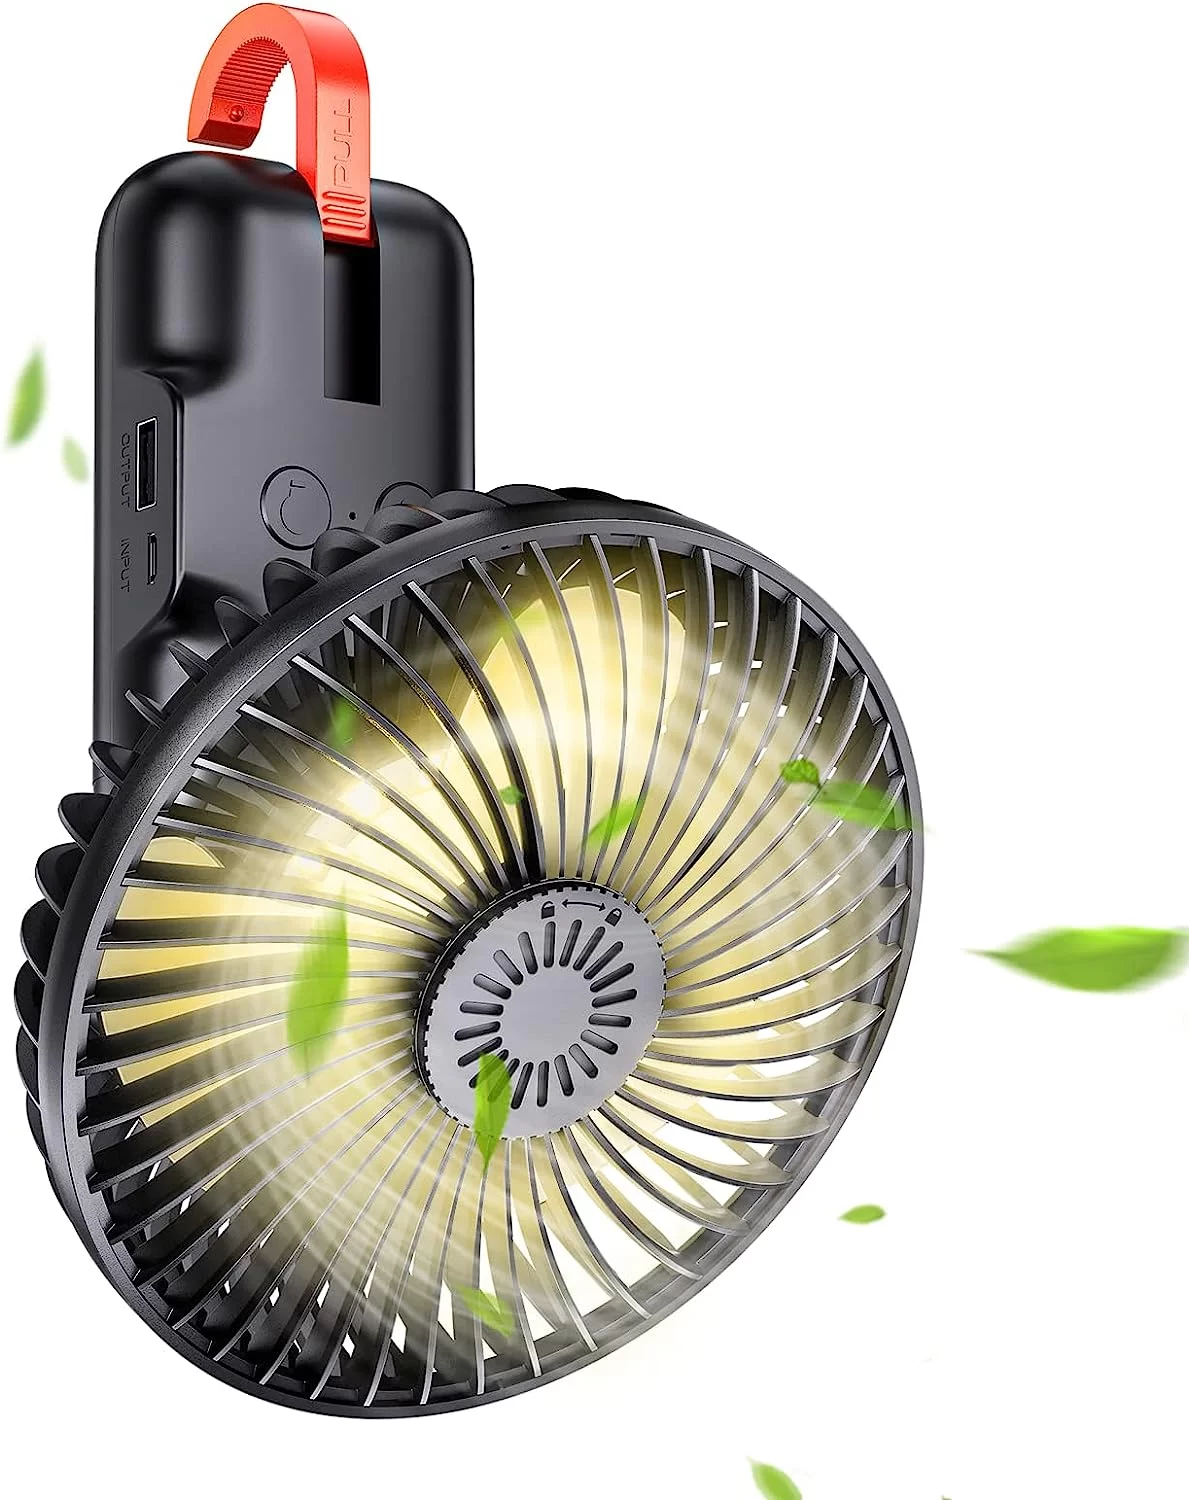
SmartDevil Portable Camping Fan with LED Lights, Rechargeable Fan
New Product Research Video 4

Namaskar, I am Chandresh Kumar, an AI avatar, today I have researched a product for you which will be very useful for you, means you can use this product outdoor with great love, and why only outdoor, wherever you want. Can use there.

I mean nowadays the heat and humidity are increasing a lot, and the condition of the light is so bad that there is no need to tell about its whole trap, because we are well aware of it. In such a situation, a product is needed which can be used for some time after charging it once. Guys, we are talking about a mini and portable smart fan, which is not only beautiful to look at, but also works very well, this mini portable smart fan gives you cool air with great love, we are proud of its features. Before talking further, you should know that this product is sold out of India a lot, if you sell in India too, then you can help people with good profit margin by providing a good product.

New Product Research: See, I searched this product by going to amazon.in, then I found that no one is selling it in India right now, if you search for the same product on amazon.com, then you can get it, which does business out of India. , so as per my suggestion you can launch this product in india by amazon.in.

For this process my team will help you out. Now let’s talk about it’s features.

There is a button to switch three different wind speeds, this camping fan is designed for outdoors. Also fitted with 12 brightness LEDs with 2 brightness settings, you can set the brightest mode as a lantern when camping, dim the night light to sleep, campers in the dark during the night, or a small Can light up the room.

This 180 degree rotating fan blows out cool air quickly, meeting your different needs. Extremely convenient and practical for camping, RV, picnic and desk.

It is backed by a rechargeable 5000mAh battery that can last for about 11 hours. With 2 charging ports (in and out), not only used as a small fan, but also used as a power bank, providing a backup power source for your mobile, laptop.

If you want to know more, you can visit our website atespost.com in the products research category. Thank you see you soon with another new product research

Other Feature –

  • 【3 Speeds & 2 Lights】One button to switch three different wind speed, this camping fan is designed for outside. Equipped 12 bright LEDs with 2 brightness settings, you can set the brightest mode as lantern during camping, set dim as nightlight for sleeping, illuminate a camper or a small room during night/ in darkness.
  • 【180 Degree Rotation】This small tent fan with 180 degree rotation, breezes quickly coolly, meet your different needs. Extremely convenient and practical for camping, RV, Picnic and desk.
  • 【Portable Fan as Power Bank】Built-in 5000mAh battery, the rechargeable battery operated fan can work for up to 11.5 hours after full charge(Speed 1). With 2 charging ports (in&out), not only applying as small fan, but also using as a power bank, which provides the backup power source for your mobile device, such as smartphone, laptop.
  • 【Hook & Aroma Diffuser】This portable fan is equipped with easy-to-open hidden hook, so you can hang the fan on the tents, branches or inside a car.The front cover is covered with aromatherapy cotton, you can drop the essential oil you want as needed.
  • 【Portable & Compact】The travel fan is of mini size(5.5*7*3.9 Inches), easy to take on the go and store.Perfect for outside.
Wireless Motion Sensor Lights
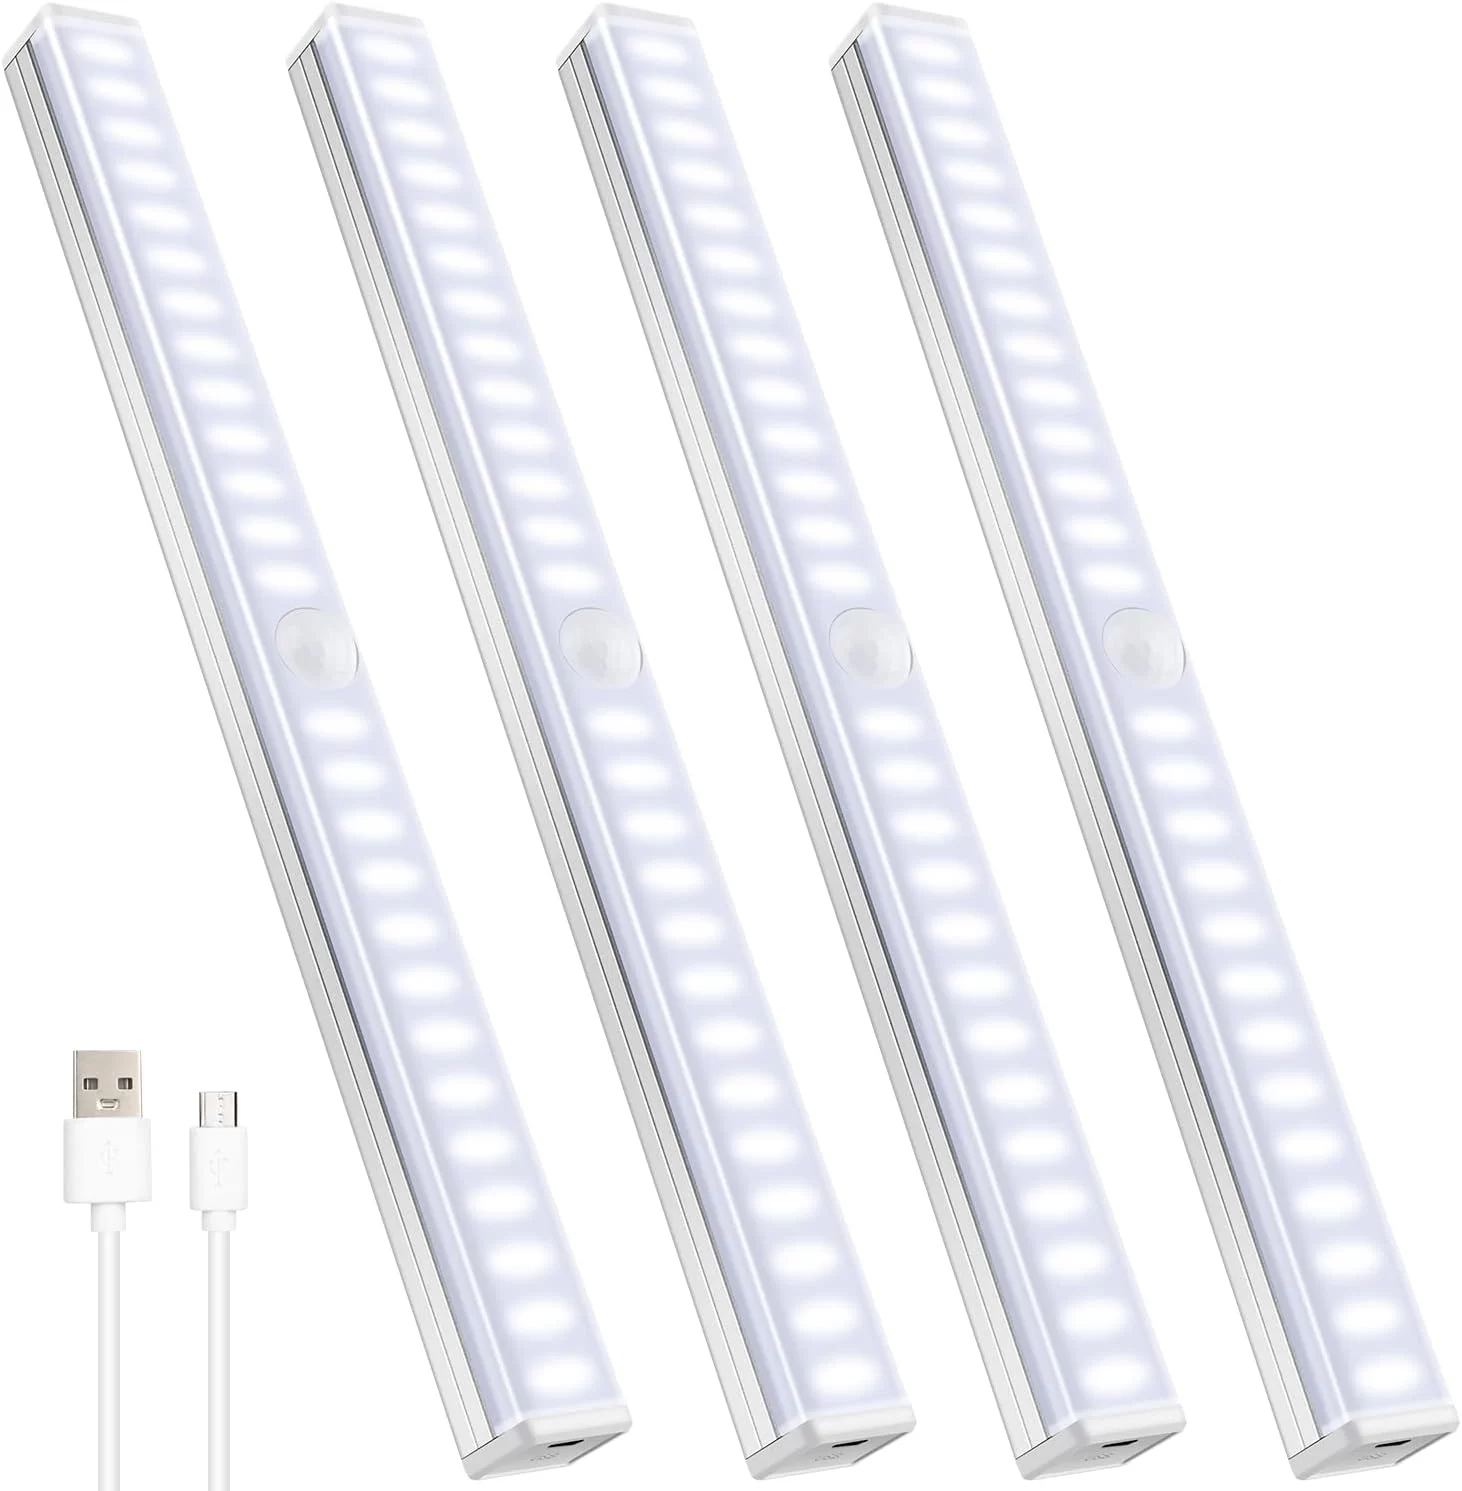
Under Cabinet Lights Wireless Motion Sensor Light Indoor 12inch Closet Lights Motion Sensored 26-LEDs Closet Lights

New Product Research: Hello, I am Chandresh Kumar an AI avatar, I have researched one more product for you. It is a good product, it also has a good demand in the market, you must think about such products and know what are the features of this product, what is its demand in the market, along with all this, its profit margin should also be seen.

Let’s talk about its requirement, as you know how difficult it is to work under space, especially when you are in dire need of that work.

For example, you can work in your cabinet, you can use it in the kitchen, you can use it in the almirah, Means where you need under light, it can be used there.

Talking about its features, these under cabinet lights are ultra-bright and have a modern wireless design with built-in motion sensor using passive infrared technology (PIR) that automatically turns on when motion is detected within 120°/12 feet Turns on and turns off after 20 to 30 seconds. (PIR only works in the dark/low light.)

The best thing about this product is that it is available in three modes namely – “Always-On Lighting” mode, “Always-Off Lighting” mode and “Motion Lighting” mode.

This is a super bright magnetic motion sensor light. And it is designed to be used in the kitchen, under cabinets, dark closet, stairs, bathroom, bedroom dresser, wide recess, or any other indoor space.

For more information on this, you can visit our website atespost.com in the product research category.

About this item

  • – GYTBL Wireless Motion Sensor Lights Indoor: These under cabinet lights are ultra-bright and have a modern wireless design with built-in motion sensors using passive Infrared technology (PIR) that automatically turn on when motion is detected within 120°/12 ft and turn off after 20-30 seconds. (PIR only works in the dark/low light.)
  • – 26 Incredibly Bright LEDs & Dimmable & Memory Function: Our under counter lights have 26 pure white, high-output lumen LEDs and can be set to motion/off/always on mode. Adjust the brightness by long-pressing the button in “Always-on Lighting” mode. The GYTBL closet light also has a memory function. When you turn on the closet light again, the brightness will remain the same as the previously adjusted level.
  • – Modern and Smaller Design: The 12-inch lamp body length is longer than the 7.87-inch model and the narrower design allows for placement in tight spaces. These super bright magnetic motion sensor lights are perfect for under kitchen cabinets, in dark closets, stairwells, bathrooms, bedroom dressers, wider recesses, or any other indoor space you need to illuminate.
  • – USB Rechargeable Under Cabinet Lights: With a super 1000mAh high-capacity rechargeable battery, these closet lights will light for 4-5 hours (max brightness) and 8 hours (min brightness) on a full charge in always-on mode, and it can be used for 1-2 weeks in motion mode. When it’s time for a recharge, it only takes 2 hours using the included USB cable. Note: The motion sensor light should be charged until the red light disappears.
  • – Quick and Easy Magnetic Installation: Our wireless motion sensor lights can be installed in any room without drilling any holes in your home thanks to their magnetic design. Simply peel and stick the magnetic strip to the surface you wish to hang the light from and press the LED strip into place. No tools required!
  • – Worry-Free Shopping: Our products undergo strict inspection and testing to ensure high quality and customer satisfaction. If you encounter any issues with our GYTBL Wireless Motion Sensor Lights, please contact us for a satisfactory solution.
anti-theft bag
This is Artistix Talon Anti Theft Design Bag

Friends, Marina, today I have brought such a bag for you, which is needed by everyone, you are doing job, you are going to roam somewhere or something else, this bag will help in everything. Your luggage will not only keep lipstick, lipstick, I mean laptop safe, but you can also use it for multi-use like charging mobile or going out in light rain.

Talking about its fabric, it is made of high density nylon with water resistance. And it has a front zipper pocket in which you can keep potatoes, mater tomatoes, but wallet pocket, book or tablet very comfortably.

The great thing about this bag is that it also has an anti theft pocket, so you can be free from the tension of pickpockets.

A reasonable space has also been given in this bag, which can also store the extra stuff of your mobile laptop.

Like if you are going out door then you can keep your girlfriend’s stuff, otherwise you will keep your own stuff by making a reverse face, no need to think about it, it is not a common thing, isn’t it?

And the funniest thing is that you don’t need to be a donkey in front of your girlfriend, this bag also supports a trolley belt, so you can carry it comfortably.

Find the Specification –

  • Fit Type: Western
  • MATERIAL: High Density Nylon, Water Resistance. Dimension: L x W x H (46 x 30 x 14 cm). Capacity: 25 Litres. No. of compartment: 1
  • FRONT STASH POCKET for small book, documents, goggle, medicines etc. TROLLEY CASE for easy to carry. AIR MESH and PU FOAM- BACK PADDING give extreme comfort. Reflective in front for night safety.
  • USB CHARGING PORT. Extended out charging port allows you to charge your phone while you are on the move. With an attached charging dock, you may connect a portable power bank with ease. 12 months warranty

For more information like how much is the price, where to buy, etc., the link is given in the description, go and have a look. Thank you, see you soon with new product til then, take care and bye bye

how to sell your products online
How to sell your product on amazon?

Sell Your Products Online India: This question creates a buzz in the minds of many sellers, or rather, all the sellers waste their time on YouTube to know the answer to this question, but will not let this happen now. Because you have followed ATES channel. So let’s go to answer the question

In today’s time, Amazon has reached even the smallest village of India, and that is why it has become the most popular online shopping app in India, if you want, you can sell your own product or any brand product on Amazon, today we Through this video, we will tell you how you can become an Amazon seller.

So first of all let’s talk about the benefits of becoming a seller on Amazon.

Number 1. After becoming an Amazon seller, you can market your product at the national level.
Number 2. After becoming an Amazon seller, your product can be sold online, which can be bought by any person in the country.
Number 3. If you create an Amazon seller account, then it will be a direct benefit that the sale of your product will increase a lot.
Number 4. By becoming an Amazon seller, your product will get a new identity in the whole country and your product can be built as a brand.

May you love to read – How To Sell Grocery On Amazon India

To sell your product on Amazon, you have to follow some process (Amazon par seller kaise bane)

Process number one – Documents –

Valid Email ID :- It is also necessary to have a professional email ID, because all your order related emails will come on this only.
Valid Mobile Number :- You will need a mobile number for registration.
PAN Card :- The person applying should have a PAN card number
GST Number:- It is necessary to have a GST number for the sale of goods related to GST. If you sell only GST free goods then GST number is not required
Bank Account:- For this you must have a bank account so that you can do transactions
Digital Signature – Your digital signature is also required

Above the documents, we have made a video in detail, description link has been given, you can check

Process Number Two – Creating Seller Account

There is a long process to create a seller account on Amazon, for this we have made a separate video, give the link below description, go and check it

Process Number Three – Listing Products on Amazon

When you are listing your products on Amazon, you will also have to take care of some other things, such as the title of your product, description and tags, bullet points, measurement and quality of the image, etc.

Why is my amazon seller account suspended?

So in this way you can become a seller on Amazon and sell your products on Amazon.

Thank you for watching the video, if you are facing any problem in selling on Amazon then you can take the help of our team, for this you have to visit our website www dot ates dot in.
See you soon with new video take care bye bye

How to Factory Reset XGODY GPS Navigation
How to Factory Reset XGODY GPS Navigation A Compressive Guide

ATES POST: Welcome to our comprehensive guide on performing a factory reset for your XGODY GPS Navigation. Whether you’re encountering issues with your device or simply wish to start anew, a factory reset can effectively address software glitches and restore your GPS navigation system to its default settings. In the following article, we will provide you with a detailed step-by-step walkthrough, ensuring a seamless and hassle-free process.

Why Opt for a Factory Reset on your XGODY GPS Navigation?

There are several compelling reasons to consider a factory reset for your XGODY GPS Navigation. Let’s explore some of the key benefits:

  1. Resolving Software Issues: Over time, your GPS navigation system may encounter software glitches or become unresponsive. By performing a factory reset, you can effectively eliminate these issues and restore your device to optimal performance.
  2. Clearing Personal Data: If you’re planning to sell or hand over your XGODY GPS Navigation, a factory reset ensures that all your personal data, including saved locations and preferences, is completely erased. This safeguard protects your privacy and ensures a clean slate for the next user.
  3. Eliminating Unwanted Settings: Sometimes, unintentional modifications to settings or the installation of incompatible software can disrupt the smooth functioning of your device. By initiating a factory reset, you can eradicate these unwanted settings and start fresh with a clean device.

Important Precautions Before Factory Resetting your XGODY GPS Navigation

Prior to commencing the factory reset, it’s essential to take certain precautions into account. Here’s what you need to do:

  1. Backing Up Your Data: Before initiating the factory reset process, it’s crucial to create a backup of any data you wish to retain. This includes saving your favorite locations, routes, or any personalized settings. Connect your device to a computer via a USB cable and transfer the data to a designated folder on your computer. Once the backup is complete, safely disconnect your device.
  2. Disconnecting from External Devices: To avoid potential interference during the reset process, ensure that your XGODY GPS Navigation is disconnected from any external devices such as smartphones, tablets, or PCs. This step will help maintain a smooth and uninterrupted factory reset.

Now that we’ve covered the necessary precautions, let’s delve into the step-by-step guide for performing a factory reset on your XGODY GPS Navigation. – XGODY GPS Update

Step-by-Step Guide: Factory Resetting Your XGODY GPS Navigation

Follow these carefully outlined steps to successfully perform a factory reset on your XGODY GPS Navigation:

  1. Backing Up Your Data
    Before initiating the factory reset process, it’s crucial to create a backup of any data you want to preserve. This may include saved locations, routes, or any other personalized settings. Connect your device to a computer using a USB cable and copy the data to a designated folder on your computer. Once the backup is complete, safely disconnect your device.
  2. Disconnecting from External Devices
    Ensure your XGODY GPS Navigation is disconnected from any external devices, such as smartphones, tablets, or PCs. This will prevent any interference during the factory reset process.
  3. Accessing the Reset Option
    On your XGODY GPS Navigation, locate the settings menu. The exact location may vary depending on the model and software version. Typically, you can access the settings by tapping on the gear icon or navigating through the main menu.

Once you’ve accessed the settings menu, look for the “System” or “Device” section. Within this section, you should find the option for “Reset” or “Factory Reset.” Tap on this option to proceed.

  1. Performing the Factory Reset
    After selecting the “Reset” or “Factory Reset” option, you will be presented with a warning message informing you that all data will be erased. Make sure you have backed up any important data before proceeding. If you’re ready to proceed with the factory reset, confirm your decision by selecting “Yes” or “Reset.”

The factory reset process will now commence. Your XGODY GPS Navigation will reboot and initiate the reset procedure. This may take a few minutes, so kindly exercise patience and refrain from interrupting the device during this time.

Once the factory reset is complete, your XGODY GPS Navigation will restart and revert to its original factory settings. You can now proceed to set up your device again and personalize the settings according to your preferences.

Conclusion

Congratulations! You have successfully performed a factory reset on your XGODY GPS Navigation. By following these step-by-step instructions, you have resolved software issues, cleared personal data, and eliminated unwanted settings. Enjoy a fresh start with your GPS navigation system and make the most of its optimal performance.